
Minecraft: How can two players play without a server?
This may not be as well-known as hosted servers, but it’s possible to play Minecraft with others without the hassle of creating a server. This is possible if you are two players on the same local network.
You can play Minecraft with two (or more) players by using the “Open to LAN” option from the main menu. Other players can then connect to the game, as long as they’re on the same local network.
In this article, I aim to explain how this works, before showing in practice how to enable and use it.
Network Gaming on Minecraft
Let’s start with some basic principles and revisit the importance of multiplayer networking in-game.
How does it work?
First, in terms of computing, you should know that all your computers, mobile devices, and other Wi-Fi or network equipment are connected to your Internet box.
Therefore, all these computing devices belong to a single network, which allows you, if necessary, to have them communicate directly with each other.
By the way, you don’t necessarily need an internet connection to play with someone on the same network. A simple WiFi access point like this one gets the job done.
Back to Minecraft.
The game includes a network sharing function that you probably have noticed without necessarily knowing what it implies.
The principle is that while you are playing solo on your game, you can make it possible for other computers on the same network, and hence other players, to connect.
If a player joins the game, they will appear directly next to you and you can continue your adventure with a little help.
Benefits of multiplayer mode in Minecraft
Multiplayer mode is particularly useful for playing with family, with your siblings or your parents/children
But we will see later that it is even possible to invite people who are in another geographical location, thus outside your network.
This mode of local network play on Minecraft, is particularly useful and reassuring for parents.
This allows children to test the basics of multiplayer without taking the risk of letting them connect to external servers where parents will have little control over what they’ll confront (game modes, chat discussions…). If you are in this situation, I recommend reading my other article on this topic.
For everyone, this makes the game less repetitive by taking advantage of someone else’s help, and it extends its longevity. We often tend to get bored quickly on Minecraft when we limit ourselves to solo mode.
Activating network access for your game
Let’s see right away how to activate local network multiplayer mode on your computer, this is the simplest part of this tutorial 🙂
- Launch your solo game
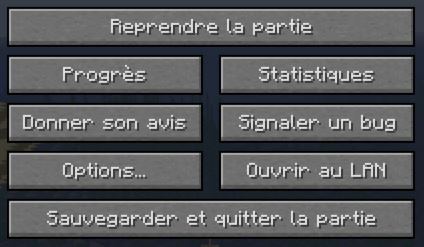
- Once in the world, press “Escape” to access the pause menu
This looks like this:
- Click on “Open to LAN”.
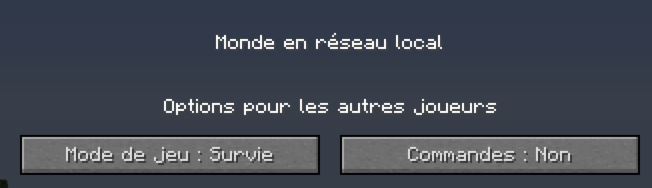
LAN is an English abbreviation, meaning “Local Area Network” - The new menu that appears looks like this :
You have two options here.
First, it is possible to change the game mode for the other players :- Switch to creative: I don’t really see the point, unless your current game mode is already in creative perhaps.
- Switch to spectator : this lets you show your map to someone without running the risk of letting them break things.
- Then you can either enable or disable commands, which would allow you certain additional commands, we will get back to this later.
I recommend you go ahead and do this for now if you want to try out what I’ll show you next. - Click on “Open to LAN” to confirm.
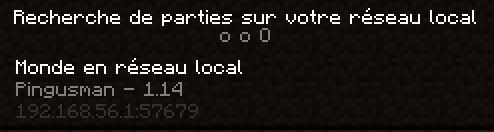
A message in the chat informs you of the successful operation :
Take note of the indicated port, you will need to communicate it to the other players.
Unfortunately, this port will change with each new sharing session, which is not going to be convenient for us.

Be aware that if you leave the game or if your network connection fluctuates, all other players will be disconnected.
You can terminate LAN access by exiting the game, otherwise, it remains active for your entire game session.
Connections and Advanced Options
You now know the basics, let’s move on to connecting from a different client and concepts you need to know.
Connecting from another computer
Connecting from another computer has also been made easier by Mojang, since the local server will be directly proposed in the multiplayer server list.
- Launch the client on another computer, with the same game version.
- Click on “Multiplayer” in the main menu.
- At the very bottom of the list you’ll find this kind of message:
- You just need to click on the server to connect.
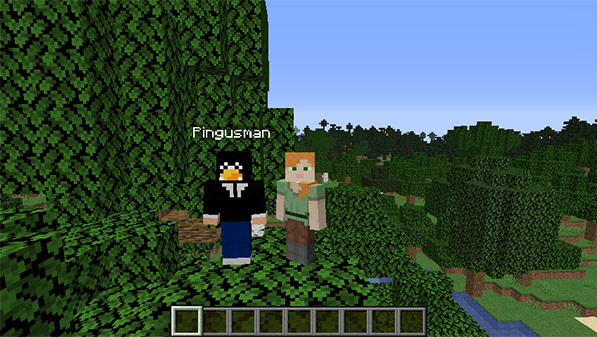
- That’s it! Now both of you are in the same Minecraft game 🙂
The new player will appear a few blocks away from you if you’re on the surface.
Note that a message in the chat indicates the connection or disconnection of a player.
It’s possible that the game may run a bit slower if your PC is limited, read my recommendations here to limit in-game lag.
Commands accessible with “cheat mode”
Once your game is open to LAN, a number of commands become usable in your game (with or without other players), for example:
- /gamemode creative|adventure|survival|spectator : This allows you to change your game mode during gameplay
I use it regularly for tutorials, as it simplifies the search for a specific location, construction, and allows to give items to yourself. - /give
For instance, if a player joins you, you can give them basic gear so that they can start quickly. - /tp
x y z : Allows you to teleport one player to another, or to a particular location. Very useful to get closer to the other player. - /time set
: This allows you to set the time of day to a certain value, values can either be integers (e.g: 6000 for noon) or simply, names in English (day, midnight, night, noon). - /weather
: The same goes for weather, use the following values: clear (fair weather), rain (rain) or thunder (thunderstorm).
That’s it for the most useful ones, you can find the list of possible commands on the Wiki or simply with autocompletion (type / and scroll).
Access from outside?
As I promised at the beginning of this article, it’s time to address the question.
Playing with family is all well and good, but it is also possible that this is limited, that your family does not play or does not play at the same times as you.
For that, there is a solution: making your LAN mode accessible from outside.
This requires some manipulation, and it’s not really practical, because the port changes each time the game is launched on the host, so there will be things to redo each session 🙁
That’s why in general I would rather advise to find a basic server to rent from a host, but if you want the free version, you’ll have to go this way.
Find Your Local IP Address
Before allowing another player to connect to your computer, you’ll need the port number noted earlier as well as your local IP address before proceeding to open the port on your internet box.
If you have tested this locally on a second computer, the information will have been displayed on the server list screen, and you simply need to retrieve it.
Otherwise, you will need to find it in your network card’s configuration on your computer. I’ll provide the path for Windows here, but the concept is similar on Linux and macOS:
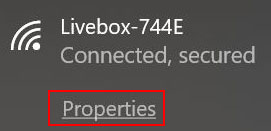
- Click on the icon corresponding to your network connection in the bottom right corner, next to the time.
- Select “Properties” from the drop-down menu that appears.
If you’re on Wi-Fi, the link is just below your current connection:
My system is in English, but aside from the order of letters it makes no difference 🙂 - A window opens, and you’ll find the “IPv4 Address” information in the properties at the bottom of the window (e.g.: 192.168.1.10).
That’s it for the local IP, we can now move on to configuring your router.
Port sharing
The rest of the setup needs to be done on your internet router.
This differs on every router and it will be hard for me to give you all possible setups.
Be aware that this option is usually found in a submenu named NAT or port sharing or firewall.
Follow your operator’s documentation if needed.
Here’s the procedure on a Livebox:
- Log into the IP address of your router, for Orange it’s 192.168.1.1.
With other providers it might be 192.168.0.254 or 192.168.0.1.
With Free and OVH, the configuration can be done from the client account. - Log in to the admin account.
- On a Livebox, this then happens in advanced mode > Advanced Options > Network > NAT.
- You must then add a NAT configuration like this one :
The internal port corresponds to the one noted in Minecraft.
The external port, you choose it, take a high number to avoid conflicts.
On Livebox, if your device is detected the entry of an IP address is not necessary. - Click on Save to validate.

The port sharing is now recorded, let’s move on to the next step.
Finding your public IP address
The next step is to find your public IP.
Indeed the other player will not be able to use your local IP this time, since it will be unknown to them.
Each internet connection has a public IP, used on the internet network.
It can sometimes be displayed on the admin interface, otherwise you can get it on a site like this one : https://webinpact.com/ip-address/.
The other player can now connect using your public IP address and the defined port (15000 in my example).
They will need to add a new server in the multiplayer part of the game, and input these two pieces of information in the IP:PORT format.
Migrating to a Local Server
This sharing system works, but it’s quite shaky for regular use.
In fact, you will be forced to modify your NAT rule each time you start the game, in order to update and indicate the new port. This is really not convenient.
And I’m not even talking about if you don’t have a fixed public IP, in which case you will need to use a service like no-ip.com or give a different connection IP each time.
If your connections are regular, creating a real Minecraft server will be a better option.
Especially if your needs are limited (playing in survival mode without mods or plugins), this will be very simple to set up.
I have already written a guide on setting up a Minecraft server.
The port sharing will only need to be done once and other players will be able to connect even if you are not currently in the game (as long as the server is running in the background).
Conclusion
And there you have it, you now know all about playing local multiplayer on Minecraft.
If you like this game mode, there are even options for you to transition to a server open to everyone later on.
I hope you found this article interesting, and if you want to learn more about this captivating game, don’t hesitate to read my other posts on the subject:
