How to Make a Windows 10 Minecraft Server For Free?
At some level in Minecraft, every player dreams of creating his own Minecraft server to play quietly with his friends or family. Unfortunately, not everyone has the finances to afford to pay for external hosting (although this is increasingly affordable), and not everyone necessarily has the knowledge either.
Don’t worry, I’ll explain everything today!
Hosting a server on its PC in a local network is something relatively simple and well documented, once the theory is known. Then some network concepts are needed to make the server accessible from the outside: opening ports or VPN for example.
In this step-by-step guide, I’ll explain everything.
I would start with the theory, to be sure that no one is lost from the start, then I will explain the installation of a basic server with Spigot, and finally the technique to make this server accessible from the outside.
Don’t hesitate to skip some steps in this guide if you want that is, depending on your level, your progress and the technologies used will not necessarily interest you.
Understanding the theory of hosting
Know the steps
Setting up a Minecraft server on Windows takes several steps:
- Installing requirements: A Minecraft server works with Java and is quite resource-intensive, so it’s important to understand what this implies, and correct if necessary.
- Choosing a Minecraft server type: There are several Minecraft server software, I’ll come back to that a little later.
- Installing the chosen server software: Once your choice is made, it’s time to move on to installation.
- Adapting the server to your desires: Before you go any further, it is recommended to set up your server, make sure everything is ready and functional. You can bring in someone else later.
- Access to other players: Access to other people on the same network is almost immediate normally, for outside access, you will have to choose and put in place a solution (I would come back to that).
The different Minecraft servers possible
As you may already know, Mojang offers to download a Minecraft server on its website. On the other hand this server is very limited, because it only allows one to create a simple server, without any additional control and with the basic game mode.
If it suits you, why not, but in general it’s not enough.
As you’re going to open it to the outside, you’ll at least want to make sure that anyone logging in won’t be able to destroy everything, maybe create permissions, etc.
To do this you will need one of the other solutions.
The one I particularly like is Spigot. This is a server very similar to that of Mojang, but that allows you to add plugins to do anything and everything.
If you want to keep the rights of newcomers to a minimum, create separate worlds, set up an economy, mini-games, etc. you can.
That is the solution that I would explain in particular.
Then, there are quite a few other more exotic solutions which contain blocks and systems not existing in the original game.
I think especially of all the moddable servers, whether it’s a technical server with industrialization, or mobs everywhere, or whatever.
In these cases I will let you refer to the documentation of the editor, it will be different depending on each launcher.
But the non-installation parts (prerequisite and external access) will probably be the same.
I also classify Hamachi servers in the latter category. The beginning and end of the article should still be of interest to you.
The main external access solutions
In theory, there are also several ways to open external access to your server.
And the choice will also be very personal. It will depend on both your Internet connection, the number of people who will be required to play, the stability expected and the level of security expected.
Simple port opening
What will usually be done by at least 80% of people is simply to open a port that will allow your friends off the network to connect remotely.
Most of the time this is enough, and the control will be done at the server level. Whether it’s with a list of authorized people (non-crack only), security plugins, or simply by turning off the server 95% of the time or no one is on it, this will be possible.
The limitation of this solution comes from the stability of access to the server.
If it’s important to you that your server is accessible all the time, but your connection doesn’t have a fixed IP address, there’s no chance that’s the right solution. We should send the new IP back to everyone every time, it seems too restrictive if the server runs all day.
No-IP
In the latter case, the solution is to go through a third-party service (free), offering to assign you a personalized domain name (servername.domainname.com for example), which will be constantly updated with the right IP address.
This is perfect, both for those who have a dynamic IP address (which changes all the time), or simply to have an address easier to remember.
It is this solution that I will present in detail at the end of this article (we will see the first also in passing, which is almost identical).
Other solutions
Other solutions such as VPNs (via Windows, OpenVPN or Hamachi) are possible, but I don’t see the point for an amateur user of a Minecraft server at home.
If you feel concerned about this case, you probably would have been better off putting a few euros into an online server, whether it’s a Minecraft server or a VPS to host it, rather than bothering you with these solutions.
As you will understand, I would not mention it in the article 🙂
Make sure you have the prerequisites installed
Before you start, you just need to make sure you’ve done this:
- Choice of the PC that will host the server: Ideally this PC uses an Ethernet cable and not Wi-Fi, never goes to sleep, has unused RAM (say 1 GB for every 5-10 players, depending on the type of server and the number of plugins).
Ideally, the processor is high frequency (the number of cores does not change anything for Minecraft). - Install Java on this PC: Here’s the download link if necessary. In general, it is already installed on most PCs because many applications need it, but in case it will be necessary.
- Access to your Internet box: Make sure you know how to access your Internet box (address and ID). You won’t be able to complete this installation without it. It depends on the operators.
- Choice of server type and version: As explained above, there are several solutions available to you for installation. I’ll show you how to do Spigot at the latest version, but if you’ve chosen anything else, it’s up to you to find out. Also think about the version you want to install, putting the last one is not necessarily the best idea if some plugins are not compatible.
This should be enough to allow you to follow up 🙂
Install Minecraft server software
Once all these preparations are complete, let’s get down to business: installing your Minecraft server on a Windows PC.
As explained previously this part now concerns Spigot only, it’s up to you to find out and adapt if you’ve made another choice.
Download Spigot
Start by downloading the file allowing the installation of the Minecraft server on the Spigot website, here is the exact address.
This will download the latest version available.
If your browser has an alert at the end of the download, be sure to click “Keep” or equivalent, so that the download ends.
If you prefer an older version, refer to the Wiki to find out which version of Spigot you need to download.
Compiling your Minecraft server
The downloaded file is not directly usable, it must first be compiled according to your computer.
Here’s how to do it:
- Open a Windows command prompt:
- In the start menu, find or search for the command prompt and launch it. You can also use the Win-R shortcut and type in the “cmd” command.
- Go to the download folder, usually it’s C:\Users\<YourUser>\Downloads
- You’re already in your User folder.
Type the command: cd Downloads must suffice.
- You’re already in your User folder.
- Then launch the following command:
java -jar BuildTools.jar - Wait a few minutes. The compilation time will depend on your computer and what additionally needs to be installed.
- In themeantime, create a folder for the Minecraft server (for example: C:\server).
- If the compilation seems to freeze, don’t hesitate to press Enter.
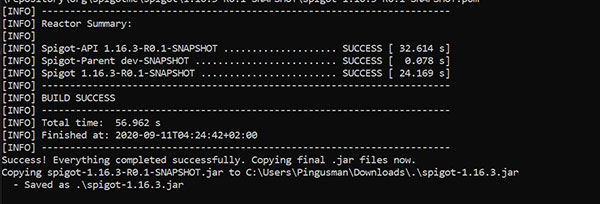
There are sometimes small display bugs in the Windows command prompt 🙂 - At the end of the compilation, you are told where the generated file is:

- Copy this file in the folder you just created (C:\server for example).
That’s it, you’re ready to move on.
Creating the start-up script
To avoid having to launch the command prompt and move each time to the right place we will create a small script to launch the server.
Here’s how to do it:
- Go to the server folder (C:\server if you kept my example).
- Create a new text file:
Right-click > New > Text Document - Rename it as a launch.bat for example
Attention, you need to have the file extensions displayed to be able to do so:
In the File Explorer: View tab > Options.
Then in the View tab > uncheck “Hide extensions of files of which the type is known”
Valid and verify that the file format is indeed “launch.bat” and not “launch.bat.txt” - Right-click on the file, and choose “Edit”
- Paste the following lines in the notepad that had to open:
java -Xmx1G -jar spigot-1.16.3.jar
pause
Adjust the amount of RAM (1GB in my example) and the name of the file if needed. - Save and close
We are ready to move on 🙂
First start
Double-click on the launch script we created, you should have a similar message:

Clearly, the launch did not work, and this is quite normal.
You must first indicate your acceptance of the rules (EULA) by changing the content of the eula.txt file.
Open the latter and replace the “false” with “true” value.
The address of the conditions is indicated so that you can read them before accepting.
Note that when there is a crash, you will always see the last lines on the screen. This will help you diagnose the problem (otherwise everything is in the “logs” folder that was created in passing).
And then the interface doesn’t close until you click a key or close the window, it’s the “pause” line of our script that allows this behavior.
Some changes
Relaunch the start-up script to complete the creation of the entire server tree.
If you have messages from the Windows Firewall, I advise you to allow access, this will facilitate the rest of the tutorial.
When the last line is displayed on the screen, the loading is complete.
Type “stop” and validate to stop the server, then close the command prompt.
If you go back to the folder, many files have been created, allowing you to set it all up:
- The server.properties file allows you to make the basic changes. I advise you to start there.
Indicate the port to use if you don’t want to use the default one, the type of server (premium or crack), the difficulty, etc. - Then there are 2 other files to look at: bukkit.yml and spigot.yml
These are additional configuration files allowing you to do lots of specific things compared to a Minecraft server in Mojang. It’s up to you to see if this can be useful to you (not necessarily mandatory for something simple with friends). - The “plugins” folder: slide in all the plugins you want to use, they will be installed at the next start.
The rest doesn’t normally need to be changed directly into the files, you can do it in-game more simply.
So I invite you to make all these changes and restart your server.
To connect for the first time from your Minecraft client, simply add the “localhost” server to the list (or “localhost:port” if you’ve changed the default port).
Make sure the connection is possible.
In my case, it worked smoothly: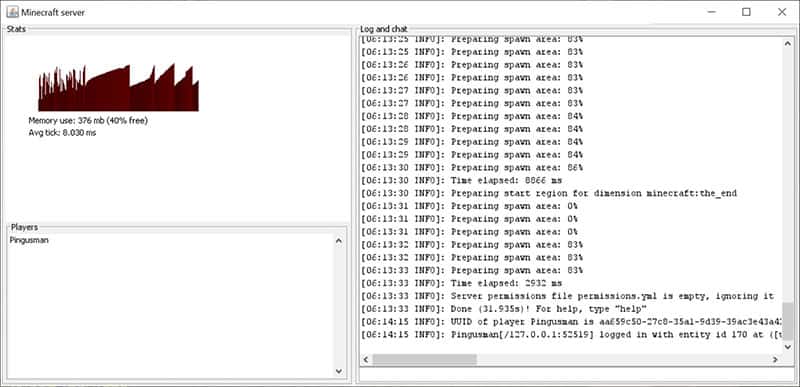
This window lets you see the use of RAM, the connected players and the last log lines of your server.
Once connected, I advise you to type the following set of commands:op <yourusername>
whitelist add <yourusername>
whitelist on
This will prevent you from having unexpected visitors until everything is ready in terms of security.
The explanation of these commands in pictures:
Personalize your Minecraft server
The basics of your server are in place, it is now accessible, but it remains pretty basic. Now it’s time to customize it completely to the image of what you want to do!
Plugins
The first thing to do is probably to install new plugins on your server.
A plugin is a small additional software that allows you to add features to your server.
Here are some examples to give you an idea:
- EssentialsX: This is probably the plugin that everyone installs on their server unless they want something as close as possible to the single player game. This adds more than 100 basic commands to your server (examples: /home, /spawn, chat, more advanced teleportation commands, etc.).
- Dynmap: Allows you to have a real-time map of your server on your website, with the location of your players
- WorldEdit: Will save you a lot of time on server preparation. In particular, it allows you to terraform and build faster, thanks to useful commands to remove entire areas, replace blocks, duplicate certain buildings, etc.
I’m not going to go into more details here because I already have an article containing the 23 most useful plugins on a server. So I’ll let you consult it before moving on.
Buildings
The construction part is unique to everyone, so I don’t have too much advice to give at this level. It is nevertheless an important phase through which you will have to go before welcoming your first players.

Indeed, I imagine you do not intend to make them appear in the middle of a desert where everyone can break blocks 🙂
Choose a style, and build your first host village.
It’s up to you to see what it will contain depending on the desired server style, and whether or not it is interesting to have a common meeting place for players.
Permissions
The last thing to remember before making your server accessible to the public is to secure it.
If you open it to everyone without any permission, you can be sure that the server will be completely destroyed at TNT in the first few days 🙂
To avoid this, you will need to install a plugin of permissions (LuckPerms for example), and probably one or more plugins of protection (WorldGuard in particular).
Of course, you will have to set them up in accordance with your wishes on how the server works.
Once this is complete, test with accounts different from your own to make sure that on these accounts you can’t do anything that should be blocked by your permissions.
And since you can never be sure that everything is under control, especially if it’s your first server, the next step is naturally to create full backups of your server at regular intervals. Make sure you manage to relaunch a new server from scratch from backup alone.
Make the Minecraft server accessible from the outside
The final step in hosting your Minecraft server on a home PC will be to make it accessible from the outside.
Indeed, it is probably only accessible from your own network at the moment, which is not the goal obviously 🙂
I should probably do a dedicated tutorial on this part (let me know if you’re interested), but I’ll give you the outlines here.
Fix the port and IP address of the machine
Before you go any further, you’re going to need two things:
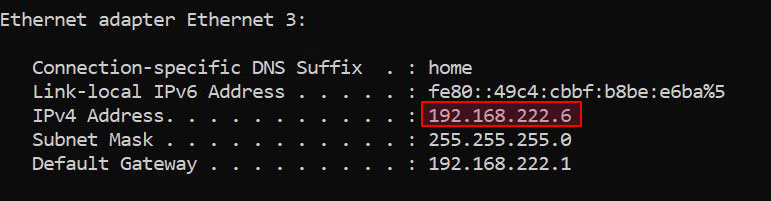
- The IP address of the PC on which the Minecraft server is launched: you can get it by typing the “ipconfig” command into a command prompt.

Also note the last line “Gateway” or “Bridge.” This is the IP address of your Internet router in general, you will need it later. - The port used by your Minecraft server: if you haven’t changed anything, it’s normally the default port 25565. To make sure, you’ll find it in the server.properties file at the root of your server folder.
Once these two or three elements are noted, we can move on.
Redirecting the Minecraft port to the pc hosting the server
The rest happens on your router, usually your Internet box, and will therefore depend greatly on the hardware you have to manage your connection.
The basic idea is that your IP address noted in the previous step is private, i.e. inaccessible from the outside.
Your Internet box has a public IP address, accessible from the outside, but which for now is not redirected to your PC, and therefore it will not work.
At this stage, we are trying to redirect the public IP address to the private IP address, and only on a specific port: that of the Minecraft server.
Here’s what to do if you have an Orange Livebox like me:
- Visit your gateway IP address in your browser (noted in the previous step).
If you are at Free, it seems to me that everything is done from your customer space, but for others in general you have an interface at this address. - In general, the interface is pretty basic at first access, and a move into a more advanced view may be necessary.
On my Livebox, it’s about clicking advanced configuration in the main menu
- Once in advanced mode, you need to find the part to make port redirects.
- , indicating which external port will be redirected to which internal port, and on which device or internal IP address.
Here is the type of line to add on Livebox:


This should be very similar on other devices.
- Save and your setup is now complete.
That’s it, it’s not that complicated once you’ve figured out where to do it.
If you’re having trouble finding it, your ISP’s documentation should probably mention it.
Know your public IP address
To find out your public IP address, that is, the one you give people to join your server, the easiest way is to go to a site that displays it in your browser, for example: https://whatismyipaddress.com/
The address indicated is to be noted, and can now be communicated (starting with your friends maybe, so that they can test without breaking everything if there is a permission ^^).
Tip if you don’t have a fixed IP
There is a problem with some connection is that this public IP address may have to change regularly (every 24 hours or so).
This doesn’t really help us in the case of a Minecraft server at home.
A trick is to go through a third-party service that automatically reviews your current IP address, and associates it with a domain name of your choice.
This is my case with Orange, and I use the no-ip.com service.
The service is free (it must be renewed every month), and to the advantage of being managed directly by the Livebox (sub-menu DynDNS in the advanced configuration).
This allows me to have a fixed address that I can use (e.g. minecraft.hopto.org), which is automatically updated by the Livebox in case of a change of address.
Common Problem: Windows Firewall
If you have outside access problems during your tests, also remember to check that your Windows firewall doesn’t make a joke of you.
Indeed, it is sometimes set quite strictly by default, and it will possibly block access to your Minecraft port.
In general, an exception is displayed when you start the Minecraft server if this is the case, but you may need to go to the security settings to change that.
The following site can be useful for doing your tests without bothering a friend outside. Enter your public IP address and port your Minecraft server, and click “Check port” to see if it is accessible or not.
Conclusion
So here we are at the end of this ultimate guide to self-hosting a Minecraft server.
I probably would have done much more detail, but I think you have the most important information in hand now, and that your new server should therefore launch well quickly!
If you have points that block you in particular, please contact me to ask me to clarify them, directly by giving you the answer or by writing a tutorial on the subject.
And as usual, remember to share this article if it helped you when creating your server.


