
What Does F3 do in Minecraft? (Complete Guide)
The debug screen in Minecraft is arguably one of the more obscure features in the game.
Some don’t even know it exists, and others know very little about its contents.
Today you’ll discover everything about this F3 screen.
In Minecraft, the F3 key opens the debug screen. This screen shows a lot of information about the game in real time. For example, it’s a useful tool to get the current coordinates, biome and light level.
We will now see line by line how to read the information there and why you should use it more often.
Overview of the debug screen in Minecraft
Before getting in too many details, I’ll give you some generic information about this screen in Minecraft.
First, you can display it at any time by using the F3 key (or Fn+F3 on some laptops and Mac).
It displays in text mode a lot of information that we will see later.
Here is what it looks like:

Unlike the other function keys (F1, F2, …), it is not possible to modify the F3 key in the controls.
In this article I will go through this entire screen, starting from the left and explaining to you what each line and each number corresponds to. Do not hesitate to directly move to the section that interests you.
The left part of the Minecraft debug screen
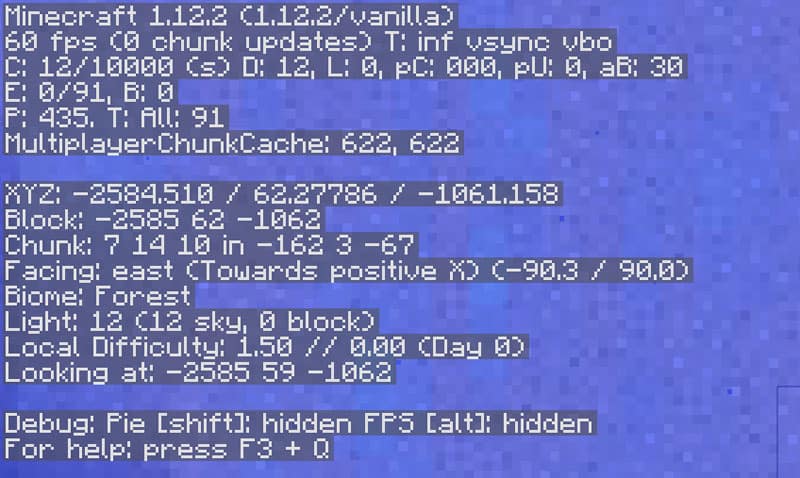
First paragraph
Let’s start with this part on the top left of the screen:

Minecraft version
The first line of this paragraph shows the version of Minecraft in use.
If you are juggling multiple versions it may remind you which one you are currently using.
Note that vanilla is displayed if you use the official launcher, and for example, Forge can be indicated if you use this launcher with mods.
FPS
The next line tells the number of FPS displayed by your computer.
FPS is the abbreviation of “frames per second”.
You then have the number of chunks being loaded (chunk updates).
Finally, I didn’t find any information on the T: at the end of the line.
Or at least what I found doesn’t match what’s displayed on my screen.
Chunks information
The following line shows information about the surrounding chunks:
- C: Number of chunks rendered out of the total number
- D: Number of chunks displayed by your client (D = distance), adjustable in the solo options
- L: Number of chunks where the light needs to be updated
- pC: Chunks awaiting processing
- pU: Chunks waiting for the video card
- aB: Places available on the waiting list for treatment
Entities
The next line is for nearby entities:
E: Number of entities rendered out of the total number of entities
B: Useless, always at 0
Particles
The penultimate line relates in particular to charged particles:
- P: The total number of particles on the screen
- T: Number of entities loaded (identical to the previous line)
Maximum chunks
Finally, the last line (MultiplayerChunkCache) displays the maximum number of chunks that can be loaded.
Second paragraph
Now let’s move on to the second part of the screen on the left, which is often better known to players.

Coordinates
The first two lines show roughly the same thing.
For the first line these are the exact coordinates of the player in the current world.
They are expressed according to 3 values: X (east / west position), Y (altitude) and Z (north / south position).
The second line indicates the position of the block under your feet, so they are basically the same values, in the same format.
Chunk
The following line gives two pieces of information:
- Your position in the active chunk. A chunk measuring 16 × 16, these values move between 0 and 15, then you switch to another chunk
- The position of the chunk in question among all the chunks in the world. Expressed as X / Y / Z
Orientation
The line beginning with “Facing:” indicates the orientation of the player.
The orientation is written in plain text (in my case I was looking east, that is to say in the direction of positive Xs given my position).
The following information shows the viewing angle, i.e. azimuth and elevation angle.
In the example, I was looking at the ground.
Biome
The next line is simple, it’s just the name of the biome you are in.
This allows you to verify that the current biome is the one you want (I am thinking of the Extreme Hills for emeralds in particular).
Light level
The Light line indicates, as you might have guessed, the brightness where you are.
The first number corresponds to the total luminosity, the second to the light coming from the sun and the last to that coming from the blocks (torches and Glowstone for example).
Difficulty
You then find the difficulty applied in the region where you are.
You should know that the level of difficulty chosen in the options varies slightly depending on where you are in the world.
So, you find the exact value here.
Finally, the end of the line indicates the number of days elapsed since the start of the game.
Direction
Finally, the line “Looking at” simply indicates the block you are looking at.
This could have been deduced from the previous information, but Mojang find it useful to give it directly ^^
Other information
At the bottom of the screen you have some shortcuts indicated to hide the FPS or to have other information.
I let you test if necessary.
What’s on the right part of the debug screen in Minecraft?
Now that the left part is clearer for you, let’s move on to the right part.
This part being simpler it should go quickly.

Java information
The first line concerns the version of Java used.
Java is the programming language used to run Minecraft.
It can therefore be useful to know the version of java used, in the case of a debug.
RAM usage
The next two lines refer to the amount of ram used, as well as that allocated for the moment.
Minecraft starts by default with 1 GB of usable RAM.
In my case, he only booked 500M of the total, and was only using 50% of that (so 25% of the total).
If you want to change the RAM allocated at startup, you can do so in your profile options.
Check this tutorial to learn more on how to optimize your Minecraft launcher.
CPU usage
The following line is obvious, and displays information about your processor.
I imagine this may explain possible problems when posting the debug screen to a forum for help.
Display
The next block gives information about your display settings.
You find in order the resolution of your screen, the model of graphics card and the version of the driver installed.
Target block
Finally, the last block displays the block currently targeted with the cursor.
The information indicated may vary depending on the target block.
For example, by aiming at leaves or wool, you will have other information that will appear.
At a minimum you will have the name of the block, then add other information on the variant of the block (log / oak), the orientation of the block, whether the leaves can fall or not, etc …
Conclusion
That’s it, I think this article is complete enough to provide you with the answers to your questions.
Note that there are different shortcuts that you can use with the F3 key, you will find the list in my complete guide to keyboard shortcuts in Minecraft.


